Structural types
The purpose of structural types is to assign type names to parts and assemblies so that those types can be used to automatically assign properties, define behavior specific to that type, or select objects based on their type.
The most obvious examples of structural types are columns and beams.
During or after the structural types are assigned to parts, we can use several tools on these parts, such as :
- Automatically assigning properties to the part. For example, assigning numbering prefix B for Beams and C for columns.
- Automatic selection of all the parts with a particular structural type
- Define a CNC scribing style specific to a structural type
- In the near future, many more applications for structural types will be implemented
Assigning structural types can be done in a number of ways :
1) Assigning automatically during numbering

When this option is enabled in the Parabuild Settings, Parabuild will automatically assign structural types to all parts when the model is numbered.
This value is enabled by default when you install Parabuild.
However, if you have updated Parabuild from an older version to v6, or if you open a drawing that was saved with a Parabuild version older than v6, then this setting will be disabled. By disabling it in older projects we can ensure that the numbering of older projects will not have a mix of old and new numbering prefixes.
If the numbering was done premature before the project was finished (for example a bill was generated), then the assigned structural types might not always be the best.
To solve this either run Classify parts on those objects, or disable automatic classification and run Classify parts when the model is (mostly) ready.
2) Assigning automatically on demand
You can use the Classify parts command to purge the previous classification of parts and automatically classify them again.
3) Assigning manually
You can use the Properties panel to assign structural types to parts.
Many Structural types can be detected and assigned automatically.
However, for most structural types the connections between the different members are used to determine the type of the parts.
The structural type detection uses the connected bolts, welds and macros to learn more about the part.
For example for a profile to be classified as a beam, it will need an end-connection on both sides.
Columns on the other hand are more quickly classified as such because their upright position alone is enough to distinguish them from all the other structural types.
Therefore it is best to automatically classify the parts when the 3D model is (largely) finished.
Once a structural type is assigned (manually or automatically), then the numbering will not try to classify the part anymore.
If you want to re-assign the structural type of parts that already have a structural type, then use the Classify parts command.
Structural types can be modified or added to from the structural types modification dialog, which can be accessed from the Parabuild Settings command.

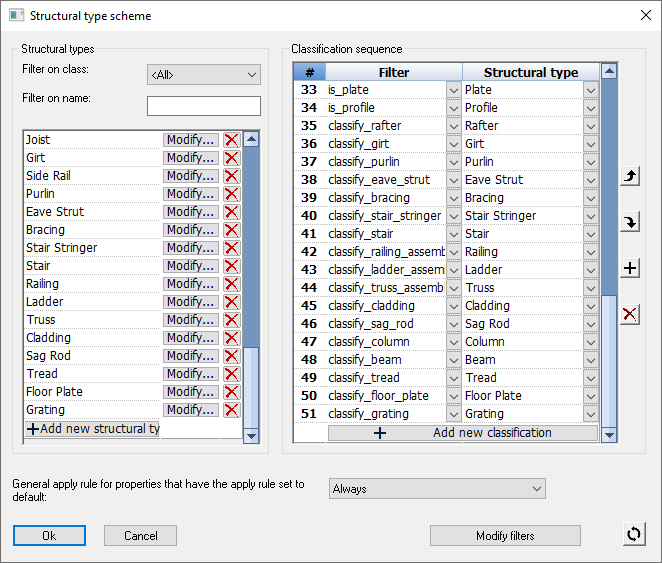
We will explore all the available options in the structural types dialog :

Structural types
Filter on class - Use this option to only show structural types for parts or only for assemblies
Filter on name - Use this option to filter the list of structural types on particular letters or words in their name
Listbox of structural types - Each row contains a structural type. Use the modify and delete button to change a particular structural type.
Add new structural type - You can add new structural types by clicking the button on the last item in this list.
Classification sequence
Listbox of classification sequences - This listbox allows you to change the priority in which structural types are assigned.
Each row represents a structural type and a filter that should be used for that structural type to be used.
When assigning structural types automatically, Parabuild will look at the first entry in this list, and will check whether the part passes through the filter. If the part passes the filter, then the part will receive the structural type and the classification of that part is done. If it does not pass the filter, then the next item on the list is attempted until it finds a match (or none).
For more information about filter, see the Object Filters topic.
Add new classification - You can add new classifications by clicking the button on the last item in this list.
General apply rule for properties that have the apply rule set to default - General apply rule for properties that have the apply rule set to Default - When a property inside a structural type has the apply rule set to Default then this apply rule will be used. The apply rule specifies when to assign properties to parts: 'Never', 'Always', or 'If not set'. The last choice will only set properties that were not already set.
 This button will reset all of the structural types to the Parabuild 'factory defaults'
When you click on Ok to save your changes, you will be prompted to save the changes to the defaults.
We recommend that you do, and always work with the same structural types on all your projects.
Not doing so can have unintended consequences, because the numbering of parts can be influenced by the structural types.
If you open and modify a drawing with different structural types, then the numbering prefixes may now be assigned differently for the modified parts. So the modified parts may then get different numbering prefixes than the unmodified parts.
Configuring a structural type
This dialog is accessible from the Structural types dialog, when modifying a single structural type.
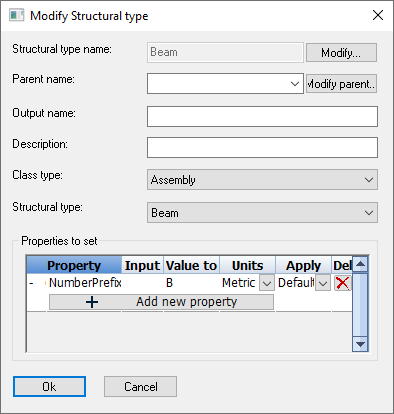
We will explore all the different options in this dialog box :

Structural type name - This is the unique name of the structural type that will be used throughout Parabuild to identify the structural type.
Parent name - The parent of this structural type. This structural type will recursively inherit all the parent's properties.
Output name - Not yet in use
Description - A description for this structural type.
Class type - Use this option to limit the applicability of the structural type to the type of object.
Structural type - If the structural type matches one of the standard built-in structural types, then it is best to choose it here. Set this to Undefined in case you are creating a new non-standard structural type.
Properties to set - Lists all of the properties that should be applied to parts when they get this structural type assigned
Each row in the list represents a property that needs to be set.
The columns in this list are explained hereafter :
- Redirection (First nameless column) - The first small column is the redirection of the property. You can change the value of this setting by clicking on it. The following different values are available for redirection :
- None - This is the default redirection. The property will be applied to the part that gets this structural type assigned.
- Main Part - When this option is used then the main part of the assembly will receive the property change on this row.
- Assembly - The property will be applied to the assembly of which the part is a part of. This redirection type will only appear when the property on this row is a valid property of an assembly.
- Property - Specifies the property that should be modified
- Input value - This is used in some cases in addition to the above property. It will be adjustable only when the property needs an additional value.
- Value to set - The actual value that should be set in the property
- Units - Set this to the units of the value that was set in the Value to set field.
- Apply - When should the value be set. Set this to If not set if you do not want the structural type to override the property of the part. When it is set to Default, then the apply option in the Modify structural types dialog will be used.
